Step 1: PLANS, ENGINEERING & BUILDING PERMITS
Shortly after we reach our agreement for building your pool, a formal "swimming
pool plot plan" will be drawn to meticulous detail. It will show all
the details of construction as we have previously agreed upon. It usually
requires about one day to complete these detailed plans.
All pertinent specifications should appear on your plan. You will receive
a copy of this Final Construction Plan before Excavation is scheduled.
Please inspect it thoroughly. It is usually easy to make changes in the
plan before work begins. But it becomes very difficult-and costly-to introduce
changes after the work has been done.
So be sure that the Plan shows exactly what you want! If something troubles
you, let's talk it over immediately. Unless you tell me otherwise, your
pool will be built as close to this plan as possible.
Step2: BUILDING PERMITS
After your plans are approved, they will be taken to the Building Department
for your area. They will do a formal plan check and issue the Building
Permits. The time required to get these permits varies from a few hours
to over a week, depending on local requirements. If your job is in a critical
soil or grading area, or has a septic tank system, the Building Department
(or the health Department) may require that an Inspector visit the site
before they issue the permit. Naturally, this would mean some delay before
we could begin construction.
When the permits are issued, they will be posted in a prominent location
at the job site. Please do what you can to help protect them from the weather
and vandals. But please DO NOT remove them to the inside of your home.
They MUST remain outside so the various Building Inspectors can get to
them easily. Your help in this will be greatly appreciated.
Step 3: Layout, Dig and Steel Pool
After we get the proper permits needed to build your pool, we accurately
measure and blueprint the specified area that you have chosen. Then we
dig and form the
shape for your chosen design. To view a construction diagram of a basic pool
and a list of what comes standard with each pool,
click here.
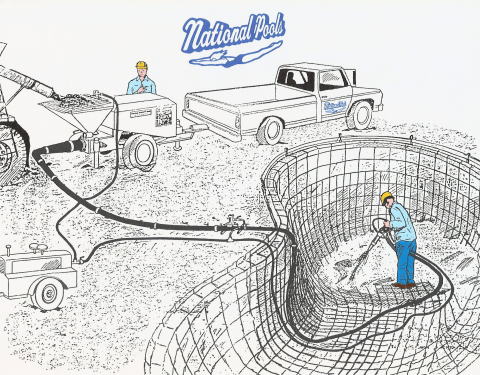
Step 4: Reinforcement and Concrete shell
Steel rods are installed, which makes a framed reinforcement for the concrete
shell of your pool. A first inspection is normally performed. Next, we
apply a special concrete mixture, called Gunite, that will have less potential
to crack over time than other shells.
Step 5:
Plumbing, Tile, and Coping
The plumbing will be added to your pool, and the decorative tile or stone
that you have chosen will be installed. The coping will also be set in
place, which is the outer surface edge around your pool that will connect
to your decking.
Step 6:
Decking
We pour the foundation for your deck. Then we install your choice of finish,
texture, or pavers. It is smart to choose a slip-resistant finish. Another
inspection is usually performed to make sure everything is being built
properly.
Step 7: Install a Screen Enclosure
We install a screen (optional) over your pool and decking to help keep
out insects and yard debris. To view basic enclosure designs,
click here.
Step 8: Interior Finish and Fill Pool
At this step, we give your pool an interior finish that is made of special
aggregate. Once this is dry, we fill your pool with water to the recommended
level.
Step 9:
Chemicals and Maintenance Instructions
The chemicals are added to your pool. Next, our staff will instruct you
on the proper way to maintain your pool so that it will provide many years
of enjoyment for your family for years to come. You will also be given
a
pool safety guide.
Step 10: Site Clean-up and Final Inspection
In the final step, we throughly clean and remove any construction debris,
and give your pool a final inspection